
Before you can understand how digital audio works, you need to know a few things about the physics of sound. This animation shows a sound wave emanating through the air from a circular source — imagine that it’s a drum or cymbal.

As you can see, sound is a wave, like a ripple in a pond. Imagine that your ear is at the bottom center of this image. The air pressure against your inner ear is rhythmically increasing and decreasing. Your brain senses how wide those swings in air pressure are and how often they’re happening, and you experience the result as a sound.
If you make a graph of the air pressure against your ear over time, it will look something like this:
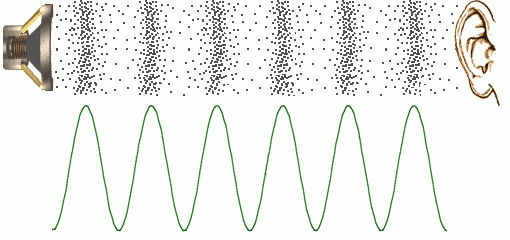
This sinusoidal waveform is very important. We’re going to be seeing a lot of it. The main task of recording is to translate that waveform into different media so it can be stored, manipulated and played back.
Sound to electricity
Microphones work like your ears. In place of your eardrum, the microphone contains a delicate little metal plate attached to a magnet. As the air pressure fluctuates against the metal, the magnet jiggles to and fro, producing a fluctuating electric current. If you draw a graph of this current’s voltage over time, you end up with a waveform that looks exactly like the above graph of air pressure over time.
There are actually several different mic technologies. Instead of a magnet, some mics produce their current by having one plate of a capacitor jiggle in response to air pressure changes. These mics require “phantom power” — instead of producing a little electric current, they modulate the current already flowing through them. Still other mics have a little hunk of piezoelectric material that throws off current as it physically jiggles.
Electricity to digits
Okay, so now you’ve got your sound encoded as an electrical current. There are a variety of ways that people have stored this current in the past: as wavy grooves in vinyl, as squiggly black lines on film, or in the alignment of magnetic particles embedded in tape. Computers store the current by taking regular voltage readings and saving each one as a number. The details of this process are complicated, but it’s good to know at least a little about how it works.
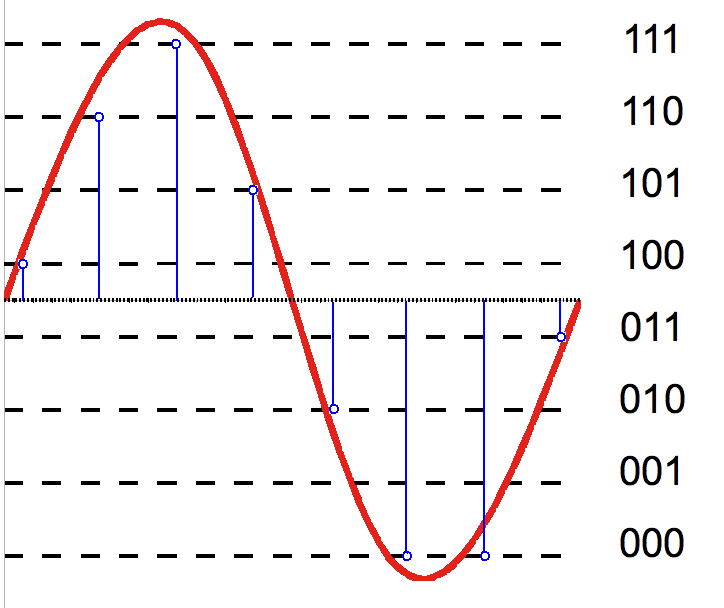
The diagram below shows pulse-code modulation, an analog-to-digital conversion technique used in the AIFF and WAV file formats. The red line is the original analog signal coming from the microphone cable, a current that fluctuates in voltage over time.

The computer takes voltage readings at regular time intervals, shown in the diagram as vertical lines. The blue dots show the computer’s reading of the voltage at a given instant. The horizontal lines show the different possible values that the computer has available to store the voltage reading; it picks the closest one to the actual voltage. An AIFF or WAV file is just a (very) long list of numbers representing all the voltage readings. Here’s a wonderful gif from the WaveNet web site showing a digital audio waveform zooming down to the sample level:

As you might guess, the more often the computer takes its readings, and the more precise each of these readings is, the better your digital audio is going to end up sounding. The frequency with which the computer is taking readings is called the sampling rate. The accuracy of each reading is called the bit depth. I’ll unpack those terms below.
Sampling rate
Analog-to-digital converters take their voltage readings extremely quickly. The CD-quality standard calls for a sampling rate of 44,100 readings per second, or as engineers say, 44,100 Hertz. Movies and TV use a sampling rate of 48,000 Hertz. That’s fast! High-end recording studios will sometimes use even faster sampling rates. The more frequently you sample the voltage, the more accurate your digital representation will be. To be more specific, higher sampling rates allow you to accurately store a wider range of frequencies. The Compact Disk standard of 44,100 samples per second covers the entire frequency range of human hearing.
Bit depth
To make sense of the idea of bit depth, you need to know how computers store numbers. Computer memory is made of billions of tiny electrical switches. These switches can be in two positions: off or on. The amount of information that can be represented by the on-off position of one switch is called a bit. And what can you do with a bit? Well, you could represent the answer to a yes/no question, or a true/false logic statement. Or you could represent two numbers: for example, zero and one.
What if you have two bits, two electrical switches? There are four possible on-off combinations of these two switches: 00, 01, 10, and 11. You could use these four settings to represent four numbers: for example zero, one, two, and three.
If you have three bits, you get eight possible combinations: 000, 001, 010, 011, 100, 101, 110, and 111. Now you can store the numbers zero, one, two, three, four, five, six, and seven. With four bits, you get sixteen possible combinations. With five bits, you get thirty-two combinations. Each bit that you add enables you to represent twice as many possible numbers.
If your analog-to-digital converter only has one bit per sample to work with, that’s not going to be a very good reading. The same is true if it uses two bits per sample. The diagram below shows two-bit audio. With only four possible voltage values to choose from, the digital version of your red waveform is going to be wildly inaccurate and will sound terrible.

Three-bit audio is a little better. Now there are eight possible numbers the computer has to choose from. The blue digital waveform is still very different from the red analog original, but at least it’s getting closer:
Four-bit audio gives sixteen possible values per sample. Now we’re starting to get somewhere.
Video games of the 1980s used eight-bit sound, meaning that each sample could have 256 different possible values. It still sounded very computer-y and fake, but at least it was recognizable.
The Compact Disk standard calls for 16-bit audio. That means that each sample can have one of 65,536 different possible values. At that bit depth, your digital approximation to the analog waveform is going to be very close, and will sound very good. At the really high end, you can record using 24-bit audio, giving you 16,777,216 different values per sample. At 44,100 samples per second, that’s going to be such a smooth and accurate waveform that even the most discriminating listeners will have trouble distinguishing it from the analog original.
Naturally, these higher bit depths demand a lot more disk space to store all the numbers. The fancy 24-bit audio files require 256 times as much space as 16-bit audio. So there’s always going to be a tradeoff between quality and disk space. You might be able to understand now why audio files are so big. CD-quality 16-bit stereo audio files are about ten megabytes per minute, and 24-bit stereo files are two and a half gigabytes per minute.
Basic microphone technique
The hardest thing about recording is getting the signal level right. If you set your microphone gain too low, you get a wimpy little voltage fluctuation. When you turn the resulting recording up loud enough to be able to hear it, you’re also turning up whatever background noise you picked up from the room and your equipment. The result will not sound too good. On the other hand, if you turn up your microphone gain too high, the voltage swings might be wider than your analog-to-digital converter can read. If that happens, the result is called digital clipping, which sounds utterly horrible.
The diagram below shows a microphone signal that’s too hot for the recording device, along with the two different kinds of distortion that result.

Analog systems respond to being overloaded with soft clipping. This smushes the waveform down and adds some harmonics to the sound. Soft clipping tends to actually sound pretty cool. Guitarists intentionally overload their amps to produce this kind of distortion, and it can sound great on tape as well. Digital systems, on the other hand, produce hard clipping when they overload. As the name suggests, hard clipping chops the tops and bottoms of the waveforms off completely. That adds a ton of awful-sounding high harmonics to the signal, and there’s no way to get rid of them afterwards. So you really don’t want to clip out your digital gear.
The big challenge while you’re recording is to find a setting for the gain knob on your recording device where you’re getting a nice full signal, but that still leaves some headroom to prevent clipping. Set your levels to accommodate the loudest and most intense part of the performance, and you should be fine.
Where should you do your recording? It depends heavily on what kind of spaces are available to you. Recording studios are best, but if you don’t have access to one, you might be able to get a good sound anyway. The video below goes into detail about recording in less-than-ideal environments.
File formats
Once you’ve got your recording, there are several different ways to save it. The aforementioned AIFF and WAV formats are both good starting points. They’re basically identical; they just store their lists of numbers in different orders. The problem with AIFFs and WAVs is that they’re really big. There are various methods for compressing audio so it doesn’t require so much space. Compression schemes come in two flavors: lossless and lossy.
Lossless compression
It’s possible to make computer files smaller without losing any actual information. A good analogy is stenographer’s shorthand, the system used by court reporters that substitutes short codes for various common words. Stenographer’s shorthand takes up less room than regular English, but it can be translated back into a verbatim transcript of everything that was said. Just as stenographer’s shorthand is a lossless compression scheme for English, so are the FLAC and Apple Lossless formats lossless compression schemes for audio. A FLAC or Apple Lossless file is about half the size of an uncompressed AIFF or WAV.
Lossy compression
You can achieve much smaller file sizes if you’re willing to sacrifice some audio quality. Lossy compression is like Cliff Notes: you can get the general idea of a book, but you won’t be able to recreate the full text in all its nuance.The mp3 format is the world’s most common lossy audio compression scheme. An mp3 file will definitely not sound as good as the uncompressed original, but can be a great deal smaller, one tenth the size of the original or less. The more audio quality you’re willing to sacrifice, the smaller you can make the file. The downside is that once that audio quality is gone, there’s no way to get it back.
Playing the sound back
Just as an analog-to-digital computer turns electricity into numbers, so does a digital-to-analog-converter turn numbers back into electricity. The converter takes all those voltage readings in the audio file and sends pulses of the appropriate strength down a wire to your speakers. The fluctuating current on the wire vibrates a magnet in the speaker. The magnet is attached to a thin paper or plastic cone, which vibrates along with it. The vibrations of the cone vibrate the air, the air vibrates your inner ear, and you hear the recorded sound.